Written by Tigran Avetisyan.
This is PART 2 in our 3 PART series on the Feast feature store. You can read PART 1 here.
In PART 1, we’ve taken a look at how you can use Feast to store and retrieve features from different data sources. We’ve also outlined how Feast can be useful for machine learning.
In PART 2, we are going to have a quick look at Feast’s data validation capabilities. We’ll also build on top of the concepts from PART 1 and show more advanced tricks for feature retrieval.
Let’s get started!
How Does Data Validation Work in Feast?
As of version 0.19.3, data quality management capabilities in Feast were limited. Feast supported only data profiling and validation, though its roadmap included things like training-serving skew detection and drift detection. So even though the concepts we will cover in this tutorial may stay unchanged over time, Feast will get more functional for data quality management going forward.
So, as we just said, only data profiling and validation were implemented in Feast version 0.19.3. To support these functions, Feast relies on the third-party Python package Great Expectations. Great Expectations is a popular framework for data validation and profiling, and it can help you make sure that your data’s statistical makeup matches your assumptions and expectations.
Great Expectations has a very wide range of functions that we won’t be exploring in this tutorial. Instead, we will cover the basics so that you understand how you can use Feast with Great Expectations. Then, you can check out Great Expectations on your own to start doing more advanced validation checks.
Prerequisites for Data Validation with Feast
If you have read Feast PART 1, we assume that you’ve already got the basic Python packages to be able to run Feast.
In addition to Feast, you will need Great Expectations, which you can install by using the pip package manager:
pip install great_expectations
Or conda, if you prefer using it instead:
conda install -c conda-forge great-expectations
Using Feast for Data Validation
After you set up Great Expectations, you can start using Feast for data validation! Let’s cover the whole process step-by-step.
Project structure overview
To help you not get lost while following this tutorial, we are going to show you what your working directory should look like, just like we did in PART 1. You can find all the project files in this GitHub repository.
By the end of this tutorial, our working directory will have the following structure:
The directories are as follows:
· feast — our working directory.
· driver_stats — our Feast feature repository with our source dataset (driver_stats_with_string.parquet), two datasets that we will create for validation (driver_stats.parquet and driver_stats_1001.parquet), the online store (online_store.db), the feature repo registry (registry.db), feature repo definitions (definitions.py), and the .yaml configuration file (feature_store.yaml).
· create_dataset.py — a script that we will use to create a dataset that we will validate future data against.
· data_exploration.ipynb and data_validation.ipynb — Jupyter notebooks that we will use for data exploration and validation respectively.
The data for this project is the driver stats dataset from the Feast demo repository. This dataset contains hourly driving statistics for several distinct drivers between 2021–04–12 and 2021–09–15. Each driver has a driver ID for identification. For each driver ID, hourly statistics are available in the specified date range.
You can download the .parquet dataset from here.
Creating a Feast feature repository
Now that the project structure is clear, let’s create a Feast feature repository. If you’ve read PART 1, you should already know how it’s done — if not, here’s a quick summary of what to do.
Create a directory named feast and run the following command in it:
feast init -m driver_stats
This command will create the directory driver_stats under the directory feast.
Next, open feature_store.yaml in driver_stats and edit the values of registry and online_store like this:
Then, create a directory named data in driver_stats and move the file driver_stats_with_string.parquet there.
Next, create a Python script definitions.py under driver_stats. As a reminder, this script will contain the definitions of our features for Feast.
Paste the following code to definitions.py:
Above, we define an entity for our data (lines 6 to 10), a file source for the data (lines 13 to 17), and a feature view for the feature columns in the data (lines 20 to 30). If your working directory is different, make sure to edit the path on line 14.
By now, your working directory should look like this:
Next, open the terminal in the directory driver_stats and run the command feast apply to register your feature definitions and deploy a feature store. The files online_store.db and registry.db will appear in driver_stats/data:
Exploring our data
Before validating our data, we need to find out a few things about it — more specifically:
· The range of the timestamps in the data.
· The unique IDs that the feature rows relate to.
Under the directory feast, create a Jupyter notebook or a Python script, whichever you think is more convenient for you. The Jupyter notebook data_exploration.ipynb in this project’s GitHub repo contains the code that you will see below.
Insert the following bit of code into your script or notebook to read the data from our .parquet file.
Note that after loading, we sort the data by the event timestamps, from the oldest to the newest (line 9).
Then, let’s see where the event timestamps start and end in the data:
Earliest event timestamp is 2021–04–12 07:00:00+00:00Latest event timestamp is 2021–09–15 17:00:00+00:0The earliest timestamp in the data is 2021–04–12 07:00:00+00:00, while the latest is 2021–09–15 17:00:00+00:00.
Let’s also have a visual look at the timestamps to make sure that there aren’t any evident gaps in the data:
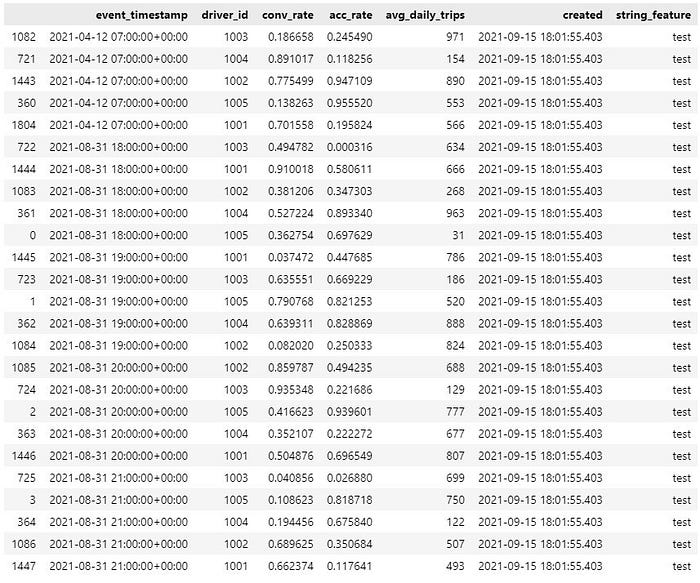
We can see that the earliest timestamp is indeed 2021–04–12 07:00:00+00:00. However, we can also see that this is the only timestamp from that day. After this date, hourly event timestamps jump to 2021–08–31 18:00:00+00:00.
Let’s also see where the timestamps end:
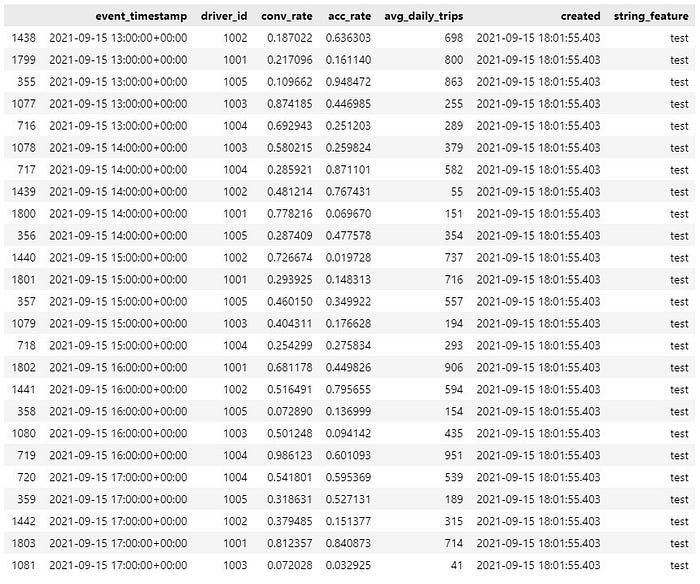
The latest timestamp is 2021–09–15 17:00:00+00:00, and it seems that there are no time gaps here.
We’ve done some more simple tests in our Jupyter notebook to make sure that there are no hidden gaps in the timestamps somewhere else. You can take a look at the tests in the notebook.
Another thing we are interested in are the unique driver IDs in the data:
Unique driver IDs are [1005 1004 1003 1002 1001]We can see that there are five IDs in the data. We can use these IDs when retrieving historical features from the source data later.
Creating a reference dataset
Now that we understand what we are dealing with, let’s move on to data validation.
To validate data from a Feast feature store, we first need to create a data reference. A reference is basically a dataset of features from a specific time range. You can validate datasets collected in the future against your reference dataset to detect disparities in the data.
To make a reference dataset, create a Python script named create_dataset.py under the directory feast. In the script, the first thing to do is to import dependencies and get our feature store:
Then, we need to create an entity DataFrame with the event timestamps that we want to get feature values for. Unlike PART 1 where we retrieved ALL data for every available timestamp, we will be explicitly selecting which timestamps to get data for.
To do this, let’s create timestamps between 2021–08–31 and 2021–09–04 (just an arbitrary range for testing purposes). We are ignoring the data from 2021–04–12 to keep things simple.
The timestamps are placed into a DataFrame under the column event_timestamp.
Note that we are dropping the first 17 timestamps on line 8. This is because event timestamps for 2021–08–31 start from 18:00. The first 17 timestamps effectively correspond to the first 17 hours of 2021–08–31.
Next, we need to combine each of the timestamps with all our driver IDs to make an entity DataFrame. Here’s how this can be done:
In this code block, we create a DataFrame with our driver IDs (lines 2 and 3). We then use the method merge and the merging method cross to create an entity DataFrame that contains a combination of every event timestamp and driver ID (lines 6 and 7). Feast will use this entity DataFrame to return the feature values for each of our driver IDs for the provided event timestamps.
As the next step, we need to get the historical features for our entity DataFrame and save them as a Feast dataset. This dataset will serve as the basis reference dataset for validation.
Let’s also get historical features for one specific driver ID — say, 1001 — and save them as well. We can use these features later to validate data specifically for the driver ID 1001. We can also reuse the timestamps that we created earlier.
Creating a profiler function for data validation
Under the directory feast, create a Jupyter notebook or a Python script for data validation. In the GitHub repo for this tutorial, the code for data validation is located in data_validation.ipynb.
In the code, import dependencies first:
And then get our feature store and the saved dataset:
We are going to use dataset as a reference dataset. Remember that dataset contains feature values for all drivers between 2021–08–31 and 2021–09–04. Below, we will retrieve values from future timestamps and validate them against dataset.
To validate data with Feast and Great Expectations, we need to create a dataset profiler function that will define expected values for the desired feature columns. Here’s a basic example of a profiler function:
We use feast.dqm.ge_profiler as a decorator for the profiler function stats_profiler so that Feast can use it to validate our feature values.
stats_profiler expects a PandasDataset object. PandasDataset is a class from Great Expectations that contains a number of methods that you can use to define expectations. We are using the methods expect_column_values_to_be_between and expect_column_mean_to_be_between in stats_profiler — you can learn more about other available methods here.
When using expectation methods from Great Expectations, you first define the feature column that you want to validate (column=”avg_daily_trips” on lines 16 and 29). You also typically provide expected minimum (min_value) and maximum values (max_value) for the feature values.
You can additionally use the parameter mostly, which determines the fraction of feature values that must match the expectation. Setting lower values means that you allow more outliers to be present in the data. For example, if we take the values passed to expect_column_values_to_be_between (lines 15 to 20), we expect 99% of values (line 17) to fall between min_value and max_value (lines 18 and 19 respectively).
On line 35, the function stats_profiler returns the comparison results. The argument discard_failed_expectations=False makes it so that expectations that haven’t been met in previous validation runs aren’t discarded from future runs.
After you design your profiling function, you can check if your expected values have all been recorded by running the following piece of code:
Lastly, after you are done with the profiler function, you create a validation reference like so:
Validating data against a reference dataset
Now, we can use our profiler function to validate new data against our reference dataset! But to do this, we need to retrieve historical data for the features that want to validate.
Let’s retrieve historical features for the dates between 2021–09–05 and 2021–09–06 — in other words, the day that follows the last day in the reference dataset:
We can then validate the retrieved features against our reference dataset, like so:
The output of this operation is as follows:
Our historical features did not pass validation for the expectation expect_column_values_to_be_between. And here’s why.
If you take a good look at the exception, you can see two instances of unexpected values under “partial_unexpected_list” — 0 and 1. There were 125 feature values in total, meaning that only 98.40% of values met our expectation criteria, while 1.6% did not. And because we expected 99% of values to match our criteria, validation failed.
Next, let’s try to extend the date range and retrieve features from between 2021–09–05 and 2021–09–15:
The result of validation would be as follows:
Validation was successful this time, which might seem surprising at first. Why would validation for a wider date range pass when the data from the very next day of the reference dataset failed?
The reason why validation passed is simple — although there likely were outliers in the data, their percentage was lower than 1%. This is because there are many more feature rows between 2021–09–05 and 2021–09–15 than between 2021–09–05 and 2021–09–06.
To make sure that this assumption was correct, we’ve tested the date range between 2021–09–05 and 2021–09–15 with mostly=0.995 — validation failed. The exception message showed that there were 8 outliers out of 1,205, or about 0.664%. 8 outliers weren’t enough to trip an error with mostly=0.99 but were enough with mostly=0.995.
So as a little tip, remember that you may get very different results depending on the amount of data you validate and the length of the date range!
To wrap up this tutorial, let’s also try validating data for the driver ID 1001, using the dataset we saved earlier. We can reuse our profiler function here.
Let’s retrieve historical features for the driver ID 1001:
And validate them:
In this instance, validation passed successfully.
In conclusion for this section, repeat the steps from above every time you want to validate features for a specific entity.
Next Steps
You now know how to retrieve features from Feast and validate them with Great Expectations! To find out more about advanced use cases of Great Expectations, make sure to read its documentation.
In PART 3, we will integrate Feast into a simple React app. Feast is pretty easy to use once you understand its basics, but we can further streamline the experience by hiding away the code behind a simple user interface.
Until next time!